|
Installing a Delta band saw blade is a straightforward process that can significantly improve the performance of your machine. The Delta upgrade kit, which includes a lower guide assembly, an upper guide assembly, a new blade guard, and Allen head bolts, offers full blade contact for maximum accuracy and reduced blade friction. The process begins by sliding the blade guard onto the post, followed by tightening the stops. Next, the upper guide assembly is fastened, and the height of the blade guard is adjusted. With the upper guide in place, the lower guide assembly can be installed using the provided Allen head bolts. Finally, the guides are adjusted to ensure proper alignment. Throughout the installation, it is important to refer to the instructions provided with the kit and take appropriate safety precautions when working with power tools. Explore related products
$1099.99
$164.39
$22.99
$354.99
$15.59
$14.5 What You'll Learn
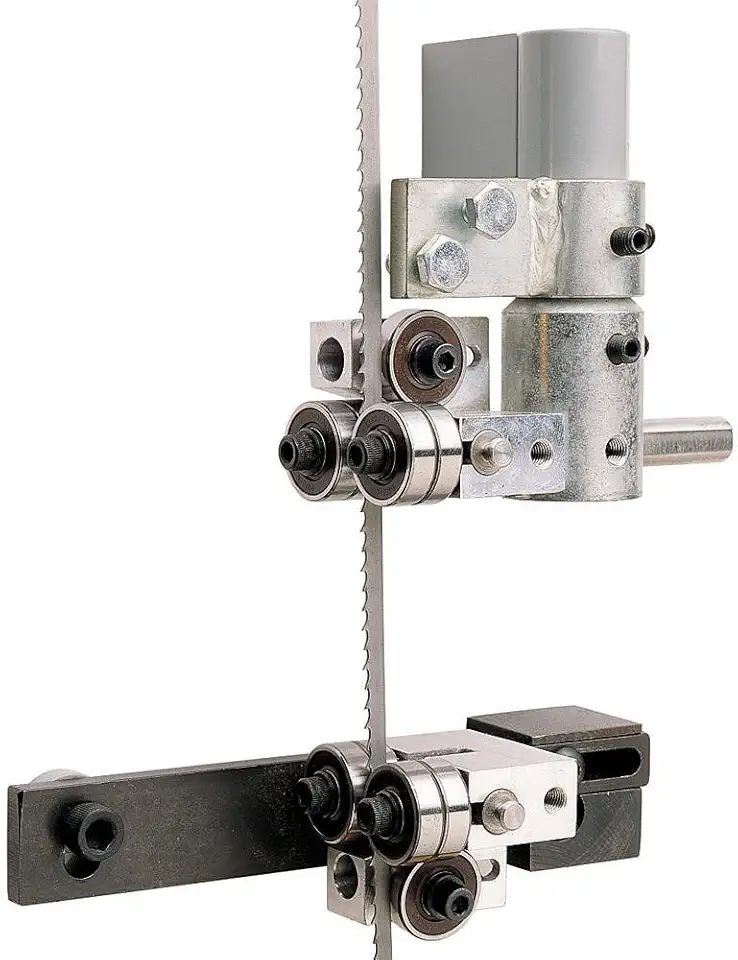
Step 1: Before beginning the installation, ensure you have the necessary tools and that you have removed the bandsaw table, the blade, and the factory guides from your machine. If you need assistance with disassembly, you can refer to online resources or the instruction manual. Step 2: When you receive your Delta 14 Guide Kit, it should include four main components: the lower guide assembly, the upper guide assembly, a new blade guard, and a set of Allen head bolts for installation. Step 3: Start by installing the blade guard. If you've upgraded your machine with a riser block, you'll need to get a sliding blade guard to accommodate the extension. Loosen the stops and slide the blade guard up about halfway onto the post. Tighten the stops just until they are snug as you will need to readjust them later. Step 4: Now, install the upper guide assembly. Loosen the stops and slide the cup onto the bottom of the post, ensuring it is straight to the front of the machine. Fasten the upper guide assembly securely in place. Step 5: Adjust the height of the blade guard. You want to maintain a gap of about one inch to three-quarters of an inch from the top of the cup. Fasten the blade guard securely. Step 6: With the upper guide assembly and blade guard in place, move on to the lower guide assembly. Begin by assembling the back bolt first, using the Allen head bolts provided in your kit. This will help you align the guide down. Step 7: Install the front bolt, ensuring that the guides are horizontal and square. Securely fasten the lower guide assembly in place. Step 8: With these steps completed, you have successfully installed the Delta 14 Guide Kit on your 14-inch machine. For any necessary reassembly or fine-tuning of your guides, refer to the instruction manual or online resources for detailed instructions. The Delta 14 Guide Kit is designed to elevate your saw's performance and precision, providing smoother and more accurate cuts. It utilizes sealed ball bearing roller guides to reduce blade friction, improve cutting accuracy, and accommodate a range of blade widths.
Using a Scroll Saw for Aluminum Cutting: What You Need to Know You may want to see also
The Cobra Coil Bandsaw Tension Spring is a direct replacement for the spring in most 14" saws, including Delta, Jet, General, Rigid, Reliant, and most imported 14" bandsaws. It provides greater durability and superior strength, allowing you to properly tension larger blades and make straighter, more precise cuts. The Cobra Coil can produce over 10,000 PSI of blade tension and may improve the performance of new machines. It is easy to install and is highly recommended by users, especially for resawing. The Cobra Coil is part of Carter's Tension accessories, which also include the AccuRight® Ratchet-Rod™ and the Quick Release™ Blade Tension Toggle. The Cobra Coil is a cheap upgrade that can make a significant difference in the performance of your bandsaw, especially if your original spring is weak or permanently compressed. It is a good idea to replace your spring every 10 years or so, as they can get tired over time.
Are All Dust Bags Interchangeable on Miter Saws? You may want to see also
Ensure your Delta band saw is disassembled for easier access and adjustment. Remove any extensions, the cast iron table, fence, and motor to make the saw lighter and more manageable. Check the two rods connecting the front and back trunnions for parallelism. These rods can become out of parallel if the motor collides with something while adjusting the angle of the cut. If they are misaligned, loosen the nuts on one end, clamp a flat object to both rods, re-tighten the nuts, and verify that the rods are now parallel. Attach a dial indicator to the miter gauge of the saw. Set the dial so that the needle points to 'zero' on the infeed side of the blade, with the miter gauge pushed towards the blade. This step helps cancel out any potential wobble in the blade. Push the miter gauge towards the blade while measuring to compensate for any play in the T-slot. Note the difference in distance between the front and back of the blade. It should be around 0.003" or less. If the difference is larger than the recommended amount, loosen the screws on one of the trunnions and adjust its position by tapping it with a piece of wood and a hammer. Repeat this process until the desired alignment is achieved. When adjusting the trunnions, it is advisable to loosen the set screw in the table that acts as the 90-degree limit stop. This will prevent the screw from adding friction and making it more challenging to move the trunnions. After achieving proper lateral alignment, check the 45-degree alignment by measuring the difference between the front and back of the blade when set at a 45-degree angle. If there is a significant difference, adjust by adding or removing washers from under one of the trunnion mounts. Calculate the required displacement by multiplying the measured difference by 1.41 (the reciprocal of the sine of 45 degrees). Once you have made the necessary adjustments, recheck the blade alignment at 90 degrees and fine-tune as needed. Finally, readjust the 90 and 45-degree stops by backing out the screws, using a square and a 45-degree square to ensure the blade is at the correct angles, and then tightening the screws again. Additionally, ensure that the blade teeth are positioned slightly away from the top of the bandsaw tires to prevent the teeth from pressing into the tires.
Choosing the Right Saw for Cutting 45 Degree Angles You may want to see also Explore related products
$14.5
$197.09
$199 $239
$10.79
$299 $349
$599.99
Step 1: Prepare the Band Saw Before making any adjustments, ensure your band saw is unplugged from the power source for safety. Loosen the blade tension by turning the tension adjustment knob or using the quick-release lever if your saw has one. This step is crucial to reducing tension on the blade and preventing accidental injuries. Step 2: Position the Upper Guide Assembly Now, position the upper guide assembly at the desired height, usually about a third of the way up from the table. Tighten the locking knob to secure the guide assembly in place and ensure it's rigid, not floppy. This height adjustment will impact the cutting capacity of your saw, so choose an appropriate height based on the thickness of the material you'll be cutting. Step 3: Adjust the Rear Guide Bearing The rear guide bearing, also known as the thrust bearing, prevents the blade from being pushed off the wheels during cutting. Adjust this bearing so that it sits just behind the blade, with a gap of about 0.001" to 0.003", or the thickness of a dollar bill. It should be close enough to support the blade but not touching it when the saw is idle. Step 4: Adjust the Side Guide Bearings The side guide bearings, also known as the blade guides, restrict the side-to-side movement of the blade and prevent twisting. Adjust these bearings so that they are slightly behind the gullets (the hollow spaces between the blade's teeth) and about 0.001" to 0.003", away from the blade. They should be as close as possible without touching the blade when the saw is idle. Step 5: Finalize and Test Once you've adjusted the upper guide assembly, it's time to re-tension the blade to the appropriate level for the blade width you're using. Refer to your band saw's manual for specific tensioning instructions. After tensioning, perform a test run by briefly turning on the saw and observing if the blade runs smoothly and tracks correctly. If everything looks good, you're ready to start cutting! Tips for Optimal Performance: Always ensure your band saw blades are clean and free of debris before use. Regularly inspect and clean the guide bearings and wheels to remove any sawdust or residue that could affect performance. When adjusting the bearings, aim for minimal clearance between the bearings and the blade. This reduces blade friction and heat build-up, resulting in smoother cuts and extended blade life. If your band saw has a tracking adjustment feature, use it to fine-tune the blade position on the wheels. This will help keep the blade running straight and reduce the need for frequent adjustments. Always follow the safety guidelines provided by the manufacturer when using your band saw.
The Perfect Chainsaw for Carving: A Guide to Finding the Right Tool You may want to see also
Now, we can move on to the lower guide assembly. With the Allen head bolts provided in your kit, start out by assembling the back bolt first so that we can align our guide down. Now, put on the front bolt, ensuring that our guides are horizontal and nice and square. Now, fasten them down.
Exploring the Compatibility of Compound Miter and Circular Saw Blades You may want to see also Frequently asked questions
What should be included in the Delta 14 Guide Kit?
The kit should include a lower guide assembly, an upper guide assembly, a new blade guard, and a set of Allen head bolts to make installation easier.
What should be done first when installing the Delta 14 Guide Kit?
First, slide the blade guard up about halfway onto the post, making sure to loosen the stops. Then, tighten the stops down until they are snug.
What should be done after adjusting the blade guard?
Put on the upper guide assembly. Make sure the stops are loose, and slide the cup onto the bottom of the post, ensuring it is straight to the front of the machine. Fasten them down.
What should be done after fastening the upper guide assembly?
Adjust the height of the blade guard. You want about an inch to three-quarters of an inch to the top of the cup, then fasten it down.
What should be done after fastening the upper guide assembly and blade guard?
Move on to the lower guide assembly. Start by assembling the back bolt first with the Allen head bolts provided in the kit, then align the guide down. Put on the front bolt, ensuring the guides are horizontal and square. Fasten them down. (责任编辑:) |